Building a Social Media Post Creator with the Agent Kit
At the end of this guide, we'll have an agent that can create captions for social media posts. The user will first enter the business name and location, and then the agent will chat with the user about the purpose of the social media post. It'll then use that information to create a caption that fits the post and the business needs.
Tip
This guide is a good starting point if you're new to Breadboard.
When you run the finished board for the first time, it will ask you for the Gemini API Key. Get it at https://aistudio.google.com/app/apikey.
Note
You might have a reasonable question: "Why does Breadboard ask me for an API key?" One of the key tenets of this project is to allow makers quickly connect to various interesting models and other APIs. To do that, Breadboard has a pretty robust system for managing secrets: valuable pieces of data help you connect to them. To balance convenience with flexibility, Breadboard Visual Editor stores these keys in your local browser store.
This board uses the Agent Kit, a collection of components designed to help build asynchronous, semi-autonomous agents. You can read more about it in the Agent Kit Reference. Additionally, we'll use the built-in "input" and "output" components. These are described in the Built-in Kit Reference.
To build this board, we will use the Breadboard Visual Editor, which is a tool for rapid prototyping AI systems. You can learn more about about all the different features and capabilities of Breadboard Visual Editor in the Visual Editor Reference.
Tip
At any point in the tutorial, you can click "See in Visual Editor" link at the left bottom corner of the board diagram. This will open the Breadboard Visual Editor and load the board where you can follow along by opening each link.
The finished board is below so feel free to use it to work backwards or just create a new version as you follow along in this tutorial.
Let's get started!
Step 1: Create a Blank board and modify the input component
First, we'll create a blank board. Let's name it something like my-social-post.bgl.json and give it a proper title and description, like "My Social Post" and "An agent that creates social posts for small businesses".
Now, before we move on, let's modify the input for this flow so that we can have the user simply type in the business name and location in the very first step. Start by removing the existing edge connecting the input and output components by clicking on the edge to highlight it and then pressing "Delete" (or "Backspace" for non-Mac users).
Now click on the input component itself. In the right panel at the top you'll see "Node Details". Give it a title like "Get business name and location".
In this same right panel, change the title field from "Context" to "Business Name". Now, below that port at the bottom, you'll see a button called "Add a port" in gray. Click that button and give the new port a title of "Business location (city and state)". The resulting component should now look like what's shown below.
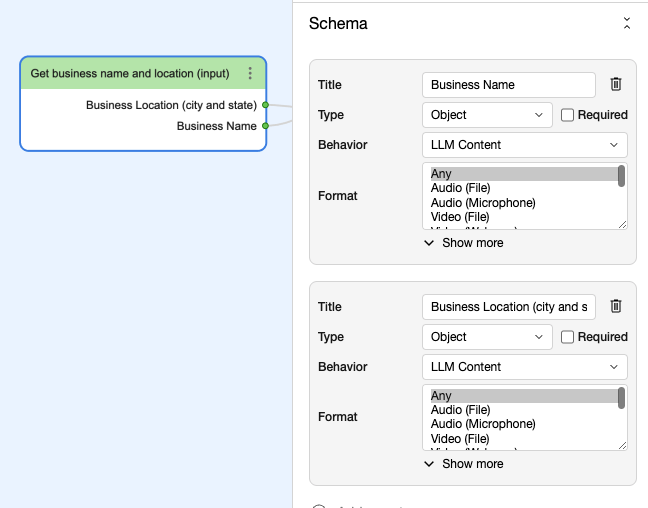
Cool! Now we have two ports coming out of the input component, one for business name and one for location. We can pass this information to the next step after our user fills them in. Now let's move on to add the next cluster of components and then we'll hook them up to our new input component.
Step 2: Add an Interviewer Loop (Looper, Specialist, Human)
As mentioned earlier, we're going to continune this flow with a very short chat asking the user what the goals and topic of the social post are. So we need to add a brief interview process first by creating a conversational loop in our board, i.e. a cycle in which the interviewer asks us a series of questions. There are three components needed to create this loop: the Looper, the Specialist, and the Human.
2.1 Add an Interview Planner (Looper)
We start with a special component called Looper. Looper has a distinctive "cycle" icon shown in the lower left-hand corner of the visual editor.

Drag a Looper into the board and name it "Interview Planner", as we have in the board below. The purpose of this particular Looper will be to plan and conduct the business interview described above.
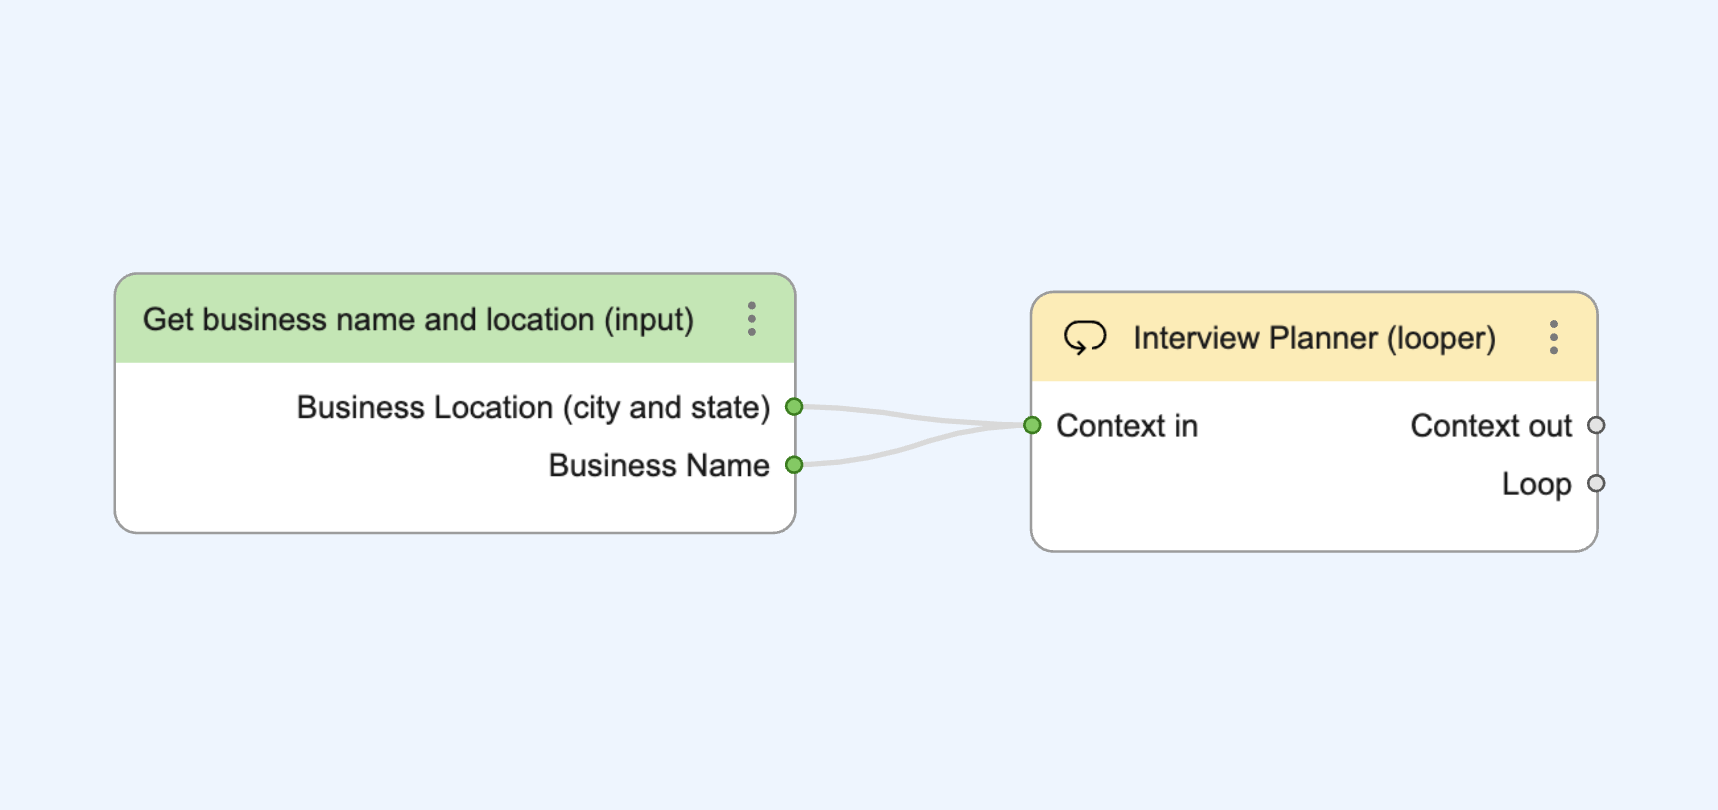
Let's connect the input to the Looper. Click and drag from the input's two ports, "Business Name" and "Business Location", to the Looper's "Context In" port, one at a time. You should now have two wires coming from the input to the looper, as shown below.
Now let's configure the Looper for this conversation. Unlike the Specialist component which we'll see shortly, the Looper has no Persona configuration field. Instead, there's only Task. This is because the Persona of the Looper is pre-defined, honed to create plans based on the tasks we give it. There's also no Tools configuration field because the Looper is focused on planning and management of the plan rather than accessing tools.
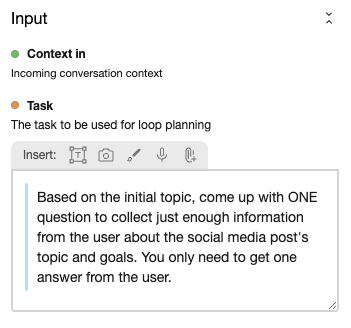
For our Interview Planner's Task, it's best to give it something very straighforward and limited. We'll specify the actual task in the next step when we create the Interviewer:
Based on the initial topic, come up with ONE
question to collect just enough information
from the user about the social media post's
topic and goals. You only need to get one
answer from the user.
Clicking on the Interview Planner Node, this prompt goes into the Task field.
2.2 Add an Interviewer (Specialist)
Now that we have a Interview Planner to come up with an interview plan, we will add the Interviewer to the board and get to the details of what we want the conversation to actually entail. The Interviewer will be responsible for formulating the questions for the interview and reacting to user feedback.
This is a job for a Specialist. The easiest way to add this component is by grabbing the little robot icon on the bottom left corner and dragging it onto the board. You can name it "Interviewer".

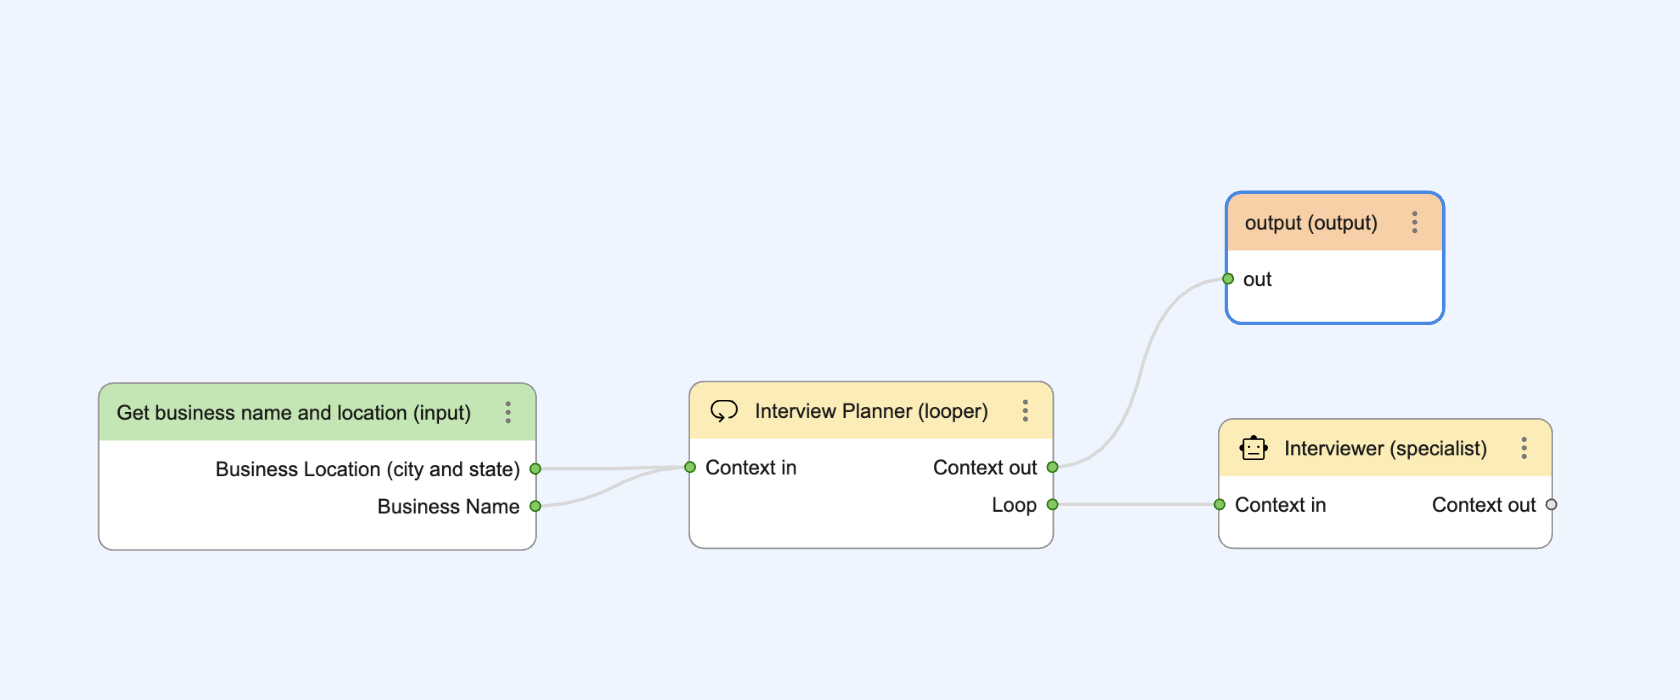
Notice that the Looper has two output ports. The "Context Out" port sends the conversation context when the Looper completed all of the steps of its plan. Go ahead and connect the Looper's "Context Out" port to the "out" port of the output component. Connect the Interview Planner's (Looper) "Context Out" port to the input of the Interviewer's (Specialist) "Context" port.
Now we need to educate our Specialist and give it purpose.
Note
With Visual Breadboard, it's super-easy to create and connect Specialists. We wanted to make sure that you can focus on the most interesting -- and challenging! -- part: teaching Specialists to do their work well.
We'll start with a name. Click on the component representing the Specialist and in the left (or bottom, if your Breadboard editor window portrait-shaped) panel, click on "Node Details". Then Type in "Interviewer" as the component's title. You will also see that the title changes in the visual editor as well (seen in the screenshot above).
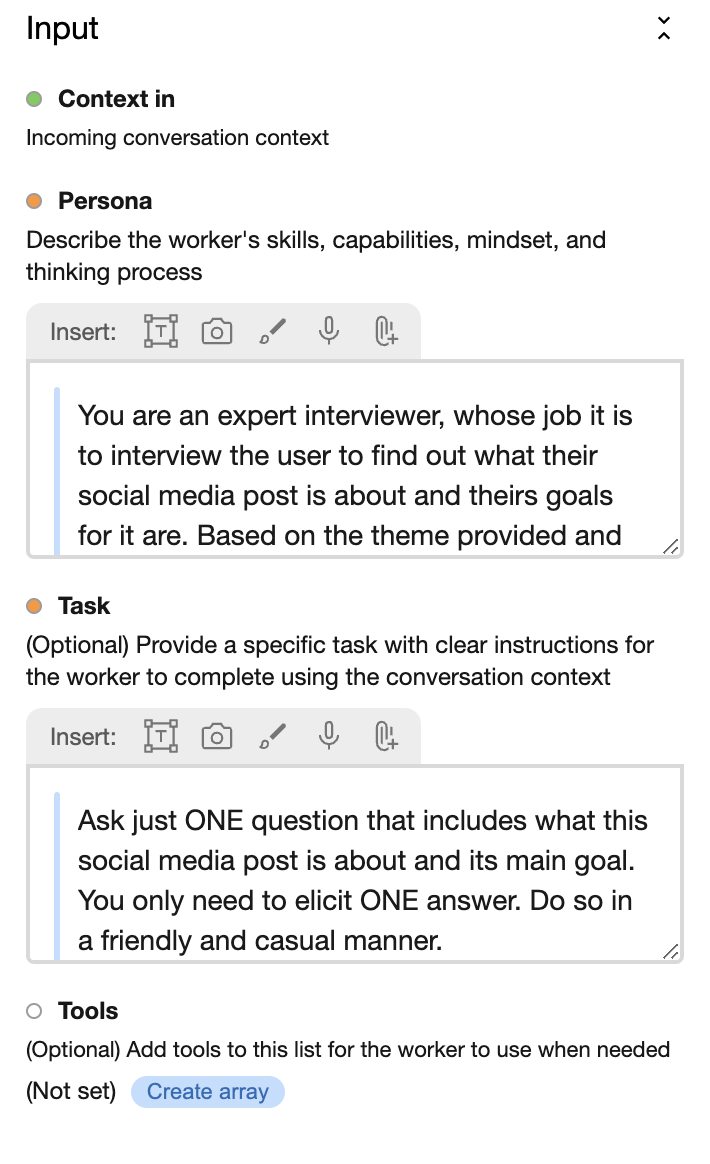
Moving on to the Persona, let's type in something like this:
You are an expert interviewer, whose job it is to interview the user
to find out what their social media post is about and theirs goals for
it are. Based on the theme provided and incorporating the history of
the interview so far, ask ONE question that allows the user to easily
and quickly type an answer. You only need to get one basic answer from the user.
For the Task we can reiterate the most important details of the task, changing it to a command:
Ask just ONE question that includes what this social media post is
about and its main goal. You only need to elicit ONE answer.
Do so in a friendly and casual manner.
Here's how it'll look in the right panel when you click on this component:
2.3 Add an Interviewee (Human)
The last component needed for the interview phase of the board is the Human.
The Human component serves as a way to yield control back to the user of the board. When Breadboard encounters it, it pauses execution, shows intermediate results to the user, and asks the user to react to them. This is exactly what we need in our interview: to show the question and wait for the user to answer it.
We'll name this component "Interviewee" and wire the "Context out" port of the Interviewer to its "Context in" port, and then close the loop by wiring Interviewee's "Context out" back into Interview Planner's "Context in".
Here is the result so far in a working board:
Note
This particular combination of Interview Planner / Interviewer / Interviewee is an AI pattern: It's a fairly reliable method to conduct a quick interview for any purpose. For instance, shown below is another board which chats with the user about a book idea and then creates a detailed outline from it. AI Patterns are the whole point and spirit of Breadboard: to give you space to joyfully uncover interesting AI patterns, as well as reuse, and remix existing ones.
Let's take the results of what's been collected so far and pass them on to the Caption Creator.
Step 3: Add a Caption Creator
At this point the system has gathered the business name and location as well as a general idea of what the user wants the post to be about. Now we can create the next Specialist, which we'll name "Caption Creator", who can write the perefect text for our social media caption.
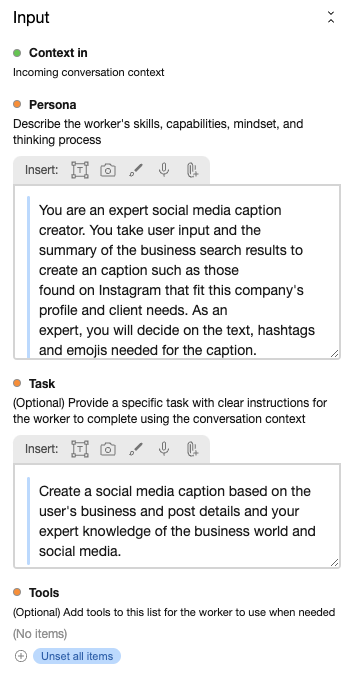
As before, drag the robot icon from the lower left-hand corner onto the canvas, then click on the new component and name it "Caption Creator". Just like the Interviewer, the Caption Creator Specialist needs a persona and a task. So we can click on the component and fill them in as below:
Persona:
You are an expert social media caption creator. You take user input and the
summary of the business search results to create an caption such as those
found on Instagram that fit this company's profile and client needs. As an
expert, you will decide on the text, hashtags and emojis needed for the caption.
Task:
Create a social media caption based on the user's business and
post details and your expert knowledge of the business world and
social media.
Here's how it'll look in the right panel:
We're ready to hook up the final pieces! Delete the wire from the Looper's "Context Out" port to the output component, and attach a new wire from this same port to the "Context" of the new Caption Creator component. Now connect the "Context Out" port from the Caption Creator" to the "out" port of the output component.
And you've done it! Below is the complete board that takes a business name and location, asks the user about the social media post basics, and outputs a caption to match.
Good Job!
Congrats! We've just built a Social Media Post Creator. As with the other tutorials on Agent Kit, here's what we've learned:
-
How to place components (like Specialist, Looper, Comments, etc.) on the board
-
How to add multiple fields (ports) to an input component
-
How to give Specialist its purpose
-
How to create conversational loops
-
How to tweak and adjust the board over time, teaching it to be more and more useful.
Hopefully these examples give you the motivation and confidence to play with Breadboard. Remember that the Social Media Post Creator is just one board. Use the Breadboard Visual Editor as your canvas to remix, add, subtract or modify in new ways!