Cookbook
This guide contains a collection of patterns aimed at answering "How do I do...?" style questions. It is very much a work in progress, so if something is missing do let us know, either via Discord or a GitHub Issue.
Splitting an Array
There are two ways to do this, one of which uses a jsonata component, the other using a runJavascript component. We'll cover both here.
In both cases we will use a runJavascript component to first generate an array with two numbers, which we will then split, and send over as two separate output values to our output component.
Using JSONata
To do this our board looks like something this:
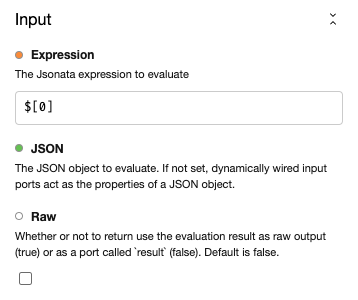
The key is to use the jsonata component to select out the array values with this query.
$[0]This line of JSONata is used to select the zeroth item of the "root entry", which in this case is the first number in the array. Similarly, to get the second number we can use the following JSONata query.
$[1]Our JSONata component details input should look like this:
Tip
JSONata can be a bit challenging to get used to, but it's also incredibly powerful and flexible. We recommend looking over the documentation and trying out the JSONata Exerciser to get familiar with it.
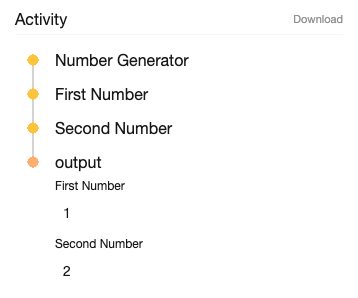
When we run the board we will see two separate outputs.
Using runJavascript
We can also use runJavascript component to obtain the values, but this is slightly more involved than using the jsonata component. The board itself looks similar to the jsonata one above.
Note
While using runJavascript involves a little more work than its jsonata counterpart, it does give us the chance to change the value or manipulate it in other ways that may be more challenging (or harder to read) in jsonata. Both are good approaches, though, and we can use whichever suits our end goals.
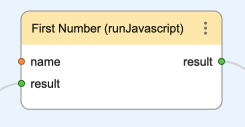
Looking at the code in the First Number runJavascript component we will see this JavaScript:
const run = ({ result }) => result[0];Here we use JavaScript to select out the first entry of the array by hand.
The name of the destructured parameter passed to run is called result. By default, however, you will see that a runJavascript component has no such input, so how do we see an additional input port called result on the runJavascript component?
Tip
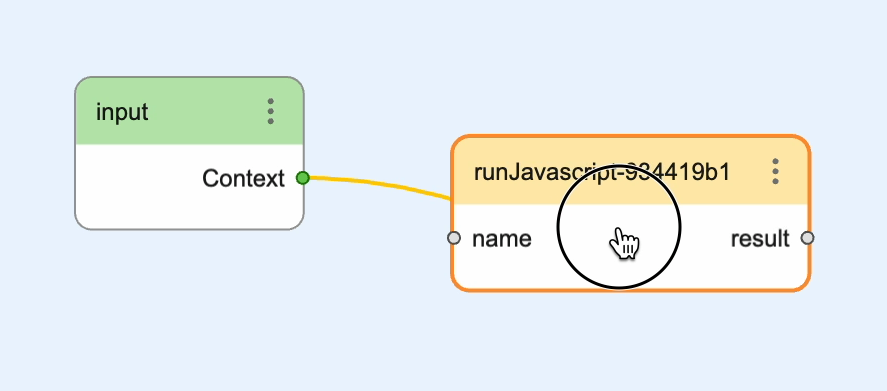
We can expand on a component within the Visual Editor by double clicking on its header. When we do this for our First Number component we will see the additional port created called result.
The answer is that we create a dynamic wire from the Number Generator to the First Number component, which is done by dragging from the Number Generator to the middle of the First Number component. On releasing the drag we will be asked to name the wire, and we can use the name result (or anything else we prefer). Whatever we call the port will then be used as the runJavascript input's name.
Splitting an Object
Building on the above example of splitting an array, we can use jsonata to do more advanced tasks. Suppose we have some JSON that looks like this:
{
  "groupA": ["Bob", "Alice", "Fred"],
  "groupB": ["Alice", "Bob", "Alice", "Jane"]
}
Now we would like to grab each property of the object individually and count the number of times we encounter the name "Alice".
Our JSONata component's Expression input could look something like this:
(
  $count_alices := function($vals) {
    $count($filter($vals, function($val) { $val = "Alice" }))
  };

  {
    "countGroupA": $count_alices(groupA)
  }
)
Note
This is making use of a custom JSONata function, which is quite a deep topic. Check out the JSONata docs for more information on these, and other features of JSONata.
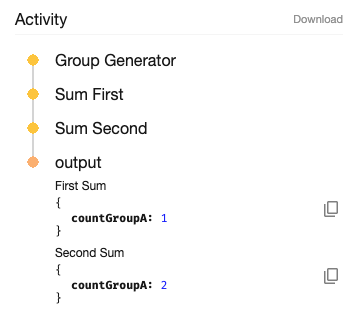
This JSONata will filter and then count the number of times the name "Alice" exists in a given list. We have one JSONata component that runs this function for the list in "groupA", and another for the list in "groupB". That makes our final board like this.
Note
We can also use runJavascript to do the same thing as JSONata here. If you have more experience with JavaScript than JSONata, this may be a preferable path to take.
The final output from our board looks like this:
Creating a conversation using Agent Kit
The Agent Kit provides the necessary building blocks for us to create an endless conversation with an LLM.
To do this we create a looper, specialist, and a human from the Agent Kit. You'll find all three in the Component selector in the bottom left of the Visual Editor. The robot icon indicates the specialist, the person icon the human, and the loop icon is the looper. We drag one of each onto the Visual Editor and wire them up.

Each component handles a distinct part of the process for us.
- Looper. This runs the conversation flow, keeping us in an endless loop going from specialist to human and back again.
- Specialist. This is an LLM-backed component that takes in the conversation history and responds to the user's most recent message.
- Human. This captures multi-modal user input and formats it correctly for the specialist.
Now we have the components we need to wire them up.
Wiring up the ports
- Connect the input's Context to the looper's Context in.
- Connect the looper's loop port to the specialist's Context in.
- Connect the specialist's Context out to the humans's Context in.
- Connect the human's Context out to the looper's Context in.
When you're done it should look a little like this.
We now need to set a couple of inputs in the looper and the specialist and we're done.
Click on the looper and enter the following Task:
You are running a conversation between a user and an agentAnd now click on the specialist and set its Persona to:
You are a helpful and cheery chat agent.
You like to find out how the user is doing and how you can help them.
Tip
You can give your components friendlier names by clicking on them and editing their title in the "Component details" pane.
And you're good to go. Hit Run and have a chat!
Fetching data
For this pattern we generally require two things: a urlTemplate component and a fetch component.
The former allows us to encode some user input (if we need to do so) into a URL, and the latter makes a request over the network to that URL.
The board generally look a little like this.
Note
The urlTemplate component is dynamic; the ports it shows depend on the string value in its Template input.
In the above example the urlTemplate has the following value for its Template input:
https://www.googleapis.com/books/v1/volumes?q={query}&orderBy=relevanceThis creates the appropriate input ports on the component -- query -- and the input is configured to request the value as a string. This is then substituted into the URL and passed to the fetch component's url input. The result of the data fetch is then on via the response output.
To see this pattern in context, why not check out our Building a Librarian with the Agent Kit guide?